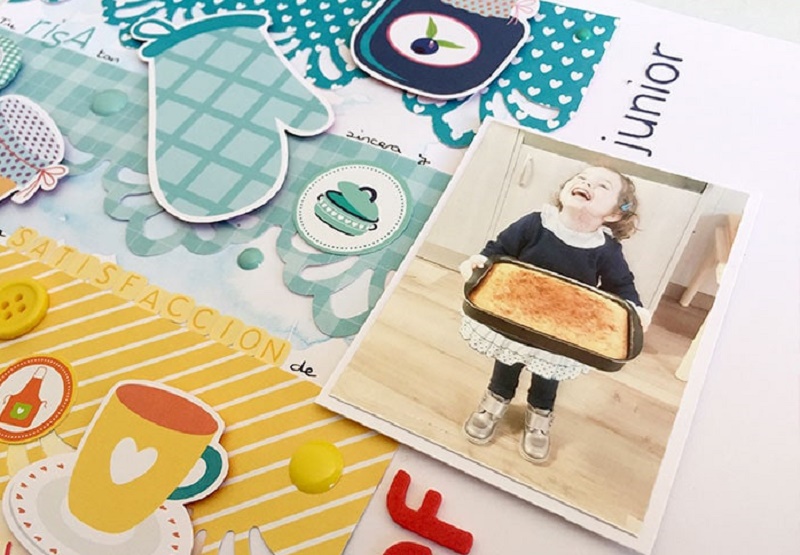
There are more, and more small chefs and children love to cook, especially since MasterChef Junior has become one of the most watched programs on television. Surely this small kitchen layout inspires you to frame the little big stars of the house.
Layouts are the very essence of scrapbooking, but for the newcomers, they tend to be very scary. However, I encourage you to make your own and soon they will become your little treasure.
For this work, I have used a beautiful collection. In my kitchen, full of color and hilarious that does justice to the photography I wanted to use. His motives are very cute, and his color palette is ideal, so it has been an easy job.
Small kitchen layout
Let’s see in detail what materials I have used:
- Watercolor paper, watercolors, and brush.
- Scrapbooking papers, cut-outs, and plates from the collection In my kitchen.
- Edge cutter of the Basics of Anita and her world.
- Enamel dots bright colors of the Basics of Anita and her world.
- Buttons of the Basics of Anita and her world.
- Alphabet sticker and foam of the Basics of Anita and her world.
- 3D pads and adhesive tape of the Basics of Anita and her world.
- Fixo Stick bar glue.
- Scissors..
Step by step to make a layout for small Chefs

Step 1
We will cut a watercolor paper to a size of 12’x 12′. We will wet the paper with water and brush in the area where we want to paint. Also, paint 5 strips of colors that match those of the papers that we will place later.
Step 2
The next step is to cut 5 strips of decorated scrapbooking paper, whose colors match those of the stripes, which we have previously painted, of about 2.5’x 6 ‘ and we will cut one of its longer edges with the hand stamping machine.
Step 3
We paste the strips of paper with an adhesive, matching each one with its color.
Step 4
We paste the photograph on one of the remains of watercolor paper with the glue stick and this one on the layout with 3D adhesive tape.
Step 5
We continue to cut out motifs from the cutout paper collection that match the colors we used in the layout. We stick them on the strips cut with 3D stickers.
Step 6
Then I added a journalist using Anita’s adhesive alphabets and her world. Again maintaining the color code. I also used a foam alphabet to create the layout title.
Finally, I filled in the gaps left in the strips with different elements and materials that match the color scheme. Small kitchen layout finished! I hope you liked it. I love reading your comments.