
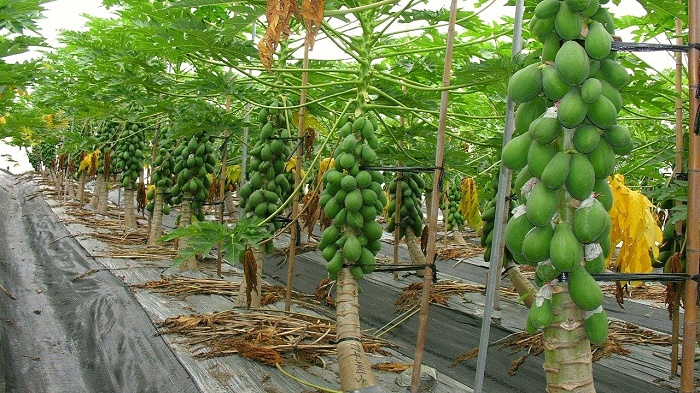
The fruit of the papaya is one of the most beneficial, consumed, rich and commercialized fruits in the world. Its sweet flavor and how easy it is to grow them have made this plant and its fruits a delicacy accessible to practically everyone. Here, we will teach you the details of growing in your garden, plant in a pot, transplant to an open space and even teach you to differentiate the genus of the papaya plant. Get ready to take notes of each of the steps that we bring you to discover how to plant papaya.
How to plant papaya in a pot?
The papaya tree (or Carica papaya) is one of the few trees that bear fruit and that can be planted in a pot without having to be transplanted, later, to open spaces to finish its development. The cultivation of the potted papaya tree is one of the easiest tasks that exist and, if that were not enough, its appearance is ideal for use as a decorative indoor plant. We discover how to plant a papaya plant in a pot with a simple step by step:

The first thing you should determine is if you want to have a potted papaya tree that will bear fruit or not. In the case of wanting them, you must choose one that is hermaphroditic, since this will speed up the fertilization process since the same plant can be pollinated.
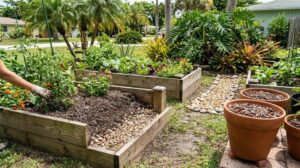
Next, you should choose a pot that is large enough, because the papaya plant usually grows 2 to 5 meters. Now you will have to prepare the pot. Add gravel to fill the bottom until it reaches a quarter of the container. This material is used, mainly, to improve drainage and prevent the roots of a plant from rotting, so it is important that you have it in your garden. Subsequently, you must proceed to fill up to a third of the pot with a substrate (can be a combination of fertilizer and brown earth). Continue reading: Spend more time in your garden this summer
Next, you will have to place the papaya seedling on the substrate and proceed to fill the edges with more substrate until it is completely sealed, but always remember that the stem should protrude on the surface.
Next, you will have to place the papaya tree in a pot in a place where it is exposed to abundant sunlight for as many hours as possible per day because this tree requires this energy to develop strong and healthy.
Finally, you will have to water the plant at its base, trying to use fertilizers diluted in water but not in large quantities. It is important that the papaya enjoy minerals such as zinc, manganese and phosphorus to develop with more vitality and produce healthy fruits.
How to plant papaya at home?

The cultivation of papaya to obtain fruits at home is, as we have said, the easiest. It does not matter if you intend to sow the seed in a pot or in your garden. The seed and what to do to make it germinate:
The first thing you should know is if the climate of your region is the ideal for a papaya plant to develop. The places where frost is frequent could kill the life of the plant in a matter of time and, in addition, this species prefers warm habitats like tropical ones.
To be able to grow papaya at home you have to prepare the land with some care: inspect the area of your garden and see that the growing area is rich in nutrients. You can also help by preparing your own substrate with the use of compost and gravel to improve drainage.
The time has come to prepare the seed: take a handful of them, pour them in a colander, shake the instrument and you will see how the seed is discovered. Then let them dry naturally for 24 hours. You can get the seeds of a papaya fruit or a specialized store.
Now that the seeds are ready, you can proceed to its cultivation: it is enough to sink the same seeds into the substrate one centimeter deep. If you want to plant several, the minimum recommended distance between one and another is 3 meters.
Once the seeds are inside the substrate you should water the plant but without flooding the area, just moisten the soil. 4 or 5 weeks later, most of the papaya seeds will have germinated. It is at this point where it will be necessary to begin fertilizing them to accelerate their growth (but without abusing). After 9 months you can enjoy some delicious sweet fruits of papaya.
Choosing Papaya plant
When choosing a papaya plant to grow at home, it is necessary to determine three things: whether the plant is male, female or hermaphrodite. For this, we will give you some practical advice that will allow you to distinguish each species of papaya according to its genus:
The easiest way to determine the sex of a papaya plant is by looking closely at its flowering stage. So, to know if the plant species is male, it will be enough to look at the separation of the flowers from the stem. The males have flowers in clusters, rooted to a long and fine branch that leaves from the main stem.
On the other hand, if the plant species is female, you will see it because the flowers will be separated and in small groups, always attached to the main stem.
Finally, if the papaya plant is hermaphroditic, you will see it because throughout the flowering stage it will present characteristics of both sexes. If the plant is hermaphrodite, you will see buds of cluster flowers well attached to the main stem.

How to transplant a papaya plant?
Transplanting papaya requires a series of steps that must be taken to the letter to do it successfully. We give you the details of how to transplant papaya in a fast, easy and safe way:
Once you have the root ball out of the pot where the seed germinated, you should proceed to dig a hole. This hole must have at least three times the size of the pot. Keep in mind that the place where the papaya will be planted must be continuously sunny and distanced from other plants or buildings, at least 10 steps away.
The next step will be to prepare the substrate: you can combine the soil that you have taken from the hole with compost and gravel to improve the drainage.
The third step, and this is optional, serves to make sure that the roots will be protected from pests. You just have to add a bit of fungicide in the soil to avoid taking risks with your plant
Next, place the root ball in the hole and fill in the edges with the treated soil. Finally, you must proceed to perform the respective irrigation so that the plant hydrates again and the earth is compacted. Remember not to flood the area, because an excess of water would make the roots could.